 If you read HackCollege, you probably know all about the volatility of hard drives and the importance of backups. It really is a matter of when and not if when it comes to hard drive failure, whether it be software or hardware related (I’ve personally dealt with corrupt permissions that couldn’t be repaired twice in the past year). There’s nothing worse than spending hours writing a paper, only to have your hard drive randomly die on you and have all that hard work go down the drain if you don’t have a backup. While it’s easy to remedy this solution for mission-critical schoolwork files by keeping them in the cloud with a free Dropbox account, 2 GB isn’t enough to backup your entire hard drive. After all, wouldn’t it be just as devastating to lose your photos, music, and movies as your schoolwork? In order to ensure you don’t lose anything – all the way down to that one preference in a program you’ve only used once, clone your hard drive with Carbon Copy Cloner (CCC) and make sure you experience almost zero downtime if case something actually does happen to your hard drive.
Platform Availability: Mac OS X 10.4 and up
Cost: It’s free donationware! Download it here!
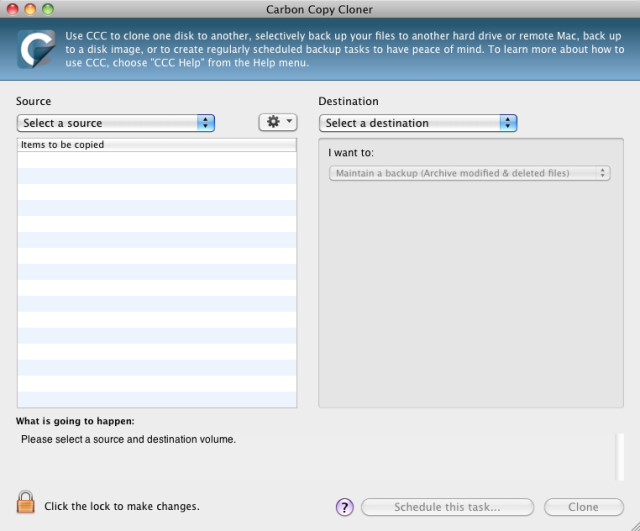
What it is: CCC is a lightweight program to clone the entire contents (every file, every preference, literally everything) of your disk block by block to another location – another hard drive, another Mac on your home network, or even a location across the Internet.
What it Does: Easy and intuitive cloning. Choose a source and a destination, then hit clone. That’s it! CCC will take care of the rest.
Features: Bootable Backups – In case something does happen, you can use your Mac OS X Install DVD to transfer contents from your CCC backup to your hard drive, restoring everything perfectly to how it was when you last modified the backup.
Incremental Backup – Save time and hard drive space with this great feature. After your initial backup, subsequent ones only copy over items that have changed since your last backup
Scheduled Backup – Easily make backing up a regular habit with this great feature. Instead of having to remember to initiate this process every week, have CCC take care of it for you. I would even schedule it to run while you’re sleeping so it doesn’t hog system resources and hard drive performance.
The Competition: SuperDuper - $27.95 - Mac OS X 10.4 and Up
ChronoSync - $40 - Mac OS X 10.4 and Up
Disk Utility - Free – Built into Mac OS X; find it in your utilities folder
Why the Featured App is Best: Honestly, CCC really doesn’t do anything revolutionary, and there’s a ton of competition in the Mac disk-cloning field. But where it holds an advantage is in the fact that it does the one thing it’s supposed to extraordinarily well. Sometimes, backing up can be such a complicated and tedious process, but CCC aims to make it as easy as possible. You can clone in literally just three steps! There aren’t any preferences to fiddle around with if you don’t want to – the developers really have made it as easy and intuitive as possible. Despite the simple nature of the program’s UX, CCC still creates robust and full-featured backups. Unlike Disk Utility, CCC creates a true block-by-block copy that you can actually use to boot your Mac. CCC also includes features like incremental and scheduled backup for free that you would have to pay for in programs like SuperDuper. ChronoSync has some really great advanced features like file comparisons and data filters, but you’re paying $40 for functionality you probably don’t need. If you want the most intuitive and full-featured Mac backup program on the market, get CCC.
Summary: Backing up your data is just like brushing your teeth – tedious but necessary. To make this important task as seamless as possible, use CCC. After you create your first backup, create a weekly schedule to let CCC do its thing and sleep easy knowing all your data’s safe in case anything ever does happen.
How do you manage your backup process? Is there an even better program/method I forgot to mention? Let us know in the comments!


 Deryck Wong
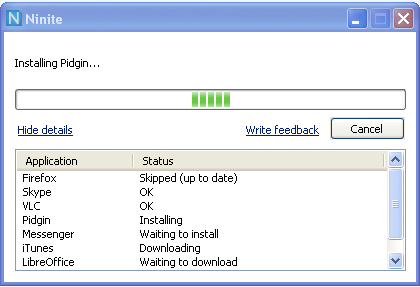 Start it up and Ninite automatically installs/updates all your selected apps.Ninite is a great website I discovered via Lifehacker that allows you to create and download a customized one-step application installer. Windows users can check out Ninite here, while Linux users should go here. The list of applications available is very extensive and covers a broad range of categories from browsers to IM clients to media players. More importantly, all this software is free and fantastic! Using Ninite couldn’t be any easier – just click the boxes to choose which applications you want in your installer, click “Get Installer” at the bottom of the page, and run the executable (which is very lightweight and only about 200 KB). That’s it! Ninite handles all the rest, downloading all the necessary files and installing them automatically.